Table of Contents
The Mac Dashboard Widgets
Mac dashboard widgets are becoming more and more fashionable, and Apple devices seem to have finally found their way.
Although many users consider it secondary, the truth is that for others, they can be tremendously helpful elements with which to have information at a glance or even have shortcuts.
That is why we will tell you in this article how you can use widgets on a Mac.
Requirements of Mac
- In old versions of Mac OS, there are no widgets as such, but rather a kind of stickers with clocks, digital post-its.
- There are other very similar elements integrated into the one known as Dashboard.
- However, to have full access to the actual and updated widgets, you must have a software version that is Mac OS 11 or later.
Versions
- This version called Big Sur has specific compatibility for the following Macs:
- MacBook (2015 and later)
- MacBook Air (2013 and later)
- MacBook Pro (Late 2013 and later)
- Mac mini (2014 and later)
- Mac Pro (2013 and later)
- iMac (2014 and later)
- iMac Pro (2017 and later)
- Put and configure widgets on a Mac.
- If you meet the above requirements, you can have full access to these widgets.
Steps
Setting them up on your Mac is simple since you will only have to follow these steps:
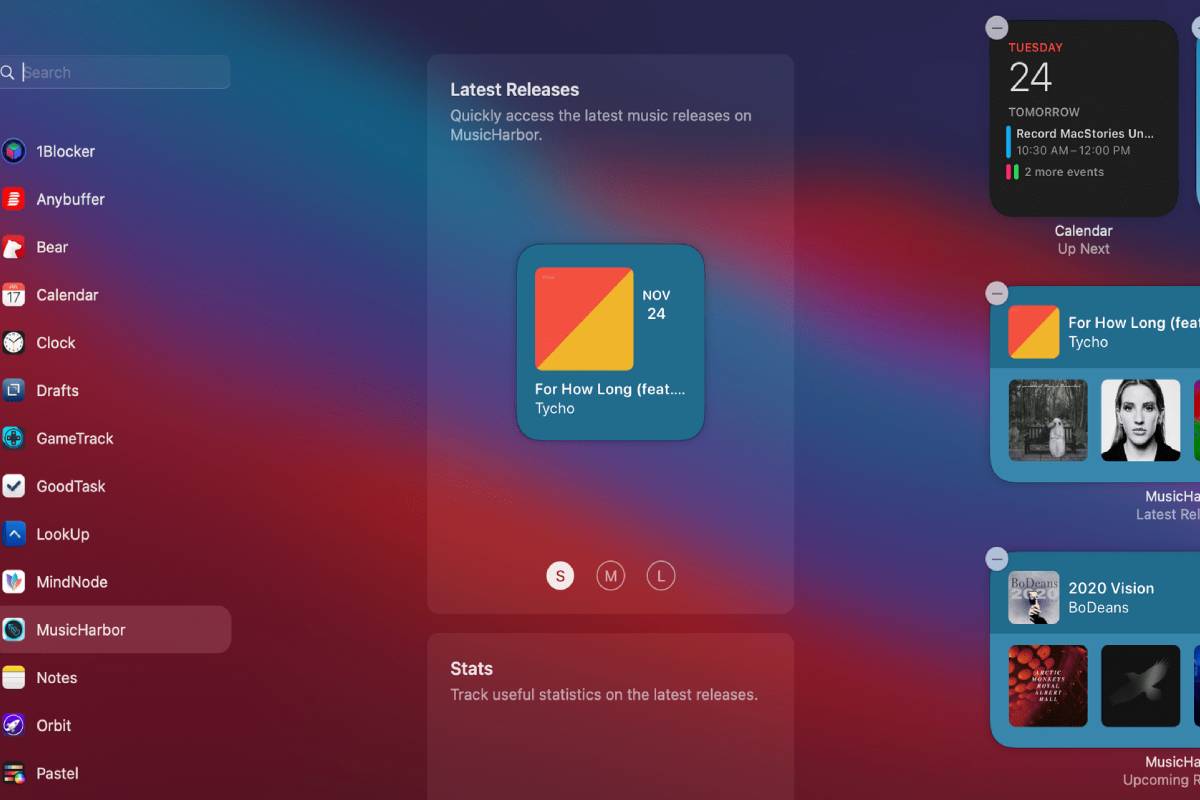
- Open the notification panel. (Click on the date and time in the upper right).
- Click on “Edit widgets” at the bottom.
- It is likely that by now, you have already found a widget on the notifications panel.
- And it is that by default, some will appear already in place, but calm if you do not like them because you can modify them from the panel you have accessed.
- On the left side of this panel, you will find all the applications that have a widget for mac.
- A search engine is to perform the search manually if many apps have these elements available.
- In the central part, the widgets will appear, and I will see them later. You can select them by clicking on them.
- It will automatically go to the correct part of which we will talk later.
- We can choose the size of the widget in most cases since you will notice that at the bottom of these, it says “P,” “M,” and “G” about it (Small, Medium, and Large).
- You will have to select this size before clicking on the widget to place it.
- On the right side will be the notification panel and widgets that will appear whenever you open it.
- Automatically, the devices you place will place at the bottom, but if you drag them instead of selecting them, you will be able to put them wherever you want.
- Also, once fixed, you can move them by making the same dragging gesture.
- When you want to exit, all you have to do is click the “Accept” button at the bottom right.
- At that moment, you will have the notification panel and widgets ready to consult whenever you want.
Limitations to consider
- iPhone with iOS 14 or later, it is possible to put the widgets on the screen on a Mac.
- Unfortunately, they are limited to a specific part of the system from the notification mentioned above panel.
- It is not a bad thing since they are within easy reach with just one click and are still very useful to consult them frequently.
- However, placed on the desktop, only files and folders are stored, but it could be a more than exciting destination to add these visual elements.
Also Read: iPhone 2020 – Design, Specifications, Applications, and More

